Yellow Yum
  • Main
  • >
  • Beauty
    • Makeup
      • Face
      • Eyes
      • Eyebrows
      • Lips
    • Looks
    • Skin Care
    • Hair
    • Nails
    • Tools
    • Fashion
  • Motherhood
    • Pregnancy
    • Baby
    • Toddler
    • Kid
  • Food
  • Home
    • Family
    • Wedding
    • Home Management
  • Adventures
    • Travel
    • Hotels
    • Spa/Massages
    • Random Ramblings
  • #CalEars
  • Giveaways
  • Youtube
  • Contact Me
Hi everyone! It's a rainy day today. I know a lot of you are just staying home. Me however, I'm at work. Busy because the opening of our new branch is just around the corner. So before all the chaos later, here's a short review that I did for San San Age Defense Two Way Cake Powder.

 San San Age Defense
Two Way Cake Powder

 I got Shade 01 (lightest warm tone shade)


I bought this powder from HBC during their SALE so I was able to get it for only P88.00. It's a steal seriously! Although the retail price is around P150, it's still a good price, I'd say.


It already comes with a sponge because you can use it for wet application. I don't use it regularly, but if I do, I use it dry. I don't really use a lot of liquid products especially for normal days.


Like what I said in the video, it's a little powdery. This is the reason why it's not as pigmented and why it doesn't give too much coverage. Even though that's the case, I still think it's a good retouch powder as you don't really need a lot of coverage for retouching. We usually use a translucent powder but some powders tend to get white, so with this powder since you are able to choose which shade to use, you can already pick out a shade that matches your color.


I bring it with me and use it to blot my oiliness away. It's also got ingredients for anti aging, obviously that's a very good benefit to get from makeup!


I would recommend it as a blotting or retouch powder. If you need heavier coverage, I would suggest you buy a different powder as this won't do. But if you're just looking for something that would mattify the face during the day, this would probably be a candidate. :)

Rating:


1.5 out of 3 Schnauzers
Good Thursday everyone! I hope you all are having a good week so far. Mine's not so bad either, just busy doing work and also updating my blog. Not complaining though. :) Can I just share, I am quite excited that H and I will be celebrating our 2nd anniversary next month? We're still in search of where to go though. Any suggestions? Just here in Luzon, driving distance. haha! Thing is, I'm not much of a beach girl. Yes, boo me. Haha! But seriously, that cuts down all the possibilities in half. So I'd appreciate any suggestions from ya'll. :)

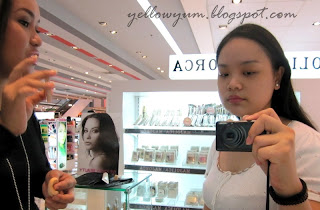
On to my post today.  One of the brands that I've been dying to get a hold of is Majolica Majorca. I love their packaging, plus it's the sister company of Shiseido. The first time I saw Majolica Majorca was abroad. I forgot if I saw it in Singapore or Thailand and I already fell in love with the products. So when I saw that they were holding a makeover and their chief artist will be giving a few makeup tips, I made sure to be in attendance!


Here's a peek of what was used on me: 


First thing's first is primer. Skin Lingerie (P695) was applied on my t-zone. This helps mattify the face and imporve imperfections. It also helps keep makeup in place and last longer. Then Marife chose Skin Remaker Pore Cover in OC20 (P1050 SALE price/ P895 refill only) as my foundation. I have to say I am AMAZED with this product! It's so smooth on the skin, it made my face really flawless!


*It turned out that OC20 is too light for me. I think I'm BC20 or OC30.


Next she filled my eyebrows with Brow Customize Set in BR660 (Dark brown) (P295 for the pencil, P225 for the holder, P295 for the powder). I heard a lot about this and it's a genius tool! There's a pencil and powder in one set!


Next it was time for eyeshadows!!! I asked Aimee if Majolica Majorca has matte eyeshadows and she said that they don't. Because young girls in Japan loves their shimmers and glitters! Haha! We chose to use two quads. I asked for a neutral look so we opted for browns and taupes.

 Majolook Trick On
BR751 (Brown)
(P795)

 Swatch (+ flash)

 Swatch (- Flash)

Apply taupe shade on the lid and the brown eyeshadow on the crease. Set it with the trick on color (white) for that 3D effect. And the gold shade was used for my lower lashline.


 Illuminator BR355
(Brown)
(P795)


 Swatch (- Flash)

Swatch (+ Flash)

Apply dark golden brown shade on the outer v to add more depth and definition to the eyes. The light gray shade (almost silver) was used for the inner corners of my eye.


Next, I was able to try out their Perfect Automatic Liner in Black (P695). This was used to line my lash line. And I chose to use their Cream Liner in Black (P595) to tightline.


Next is also another favorite, Lash Expander Mascara (P795) was used to lengthen and give my lashes volume. I wasn't able to curl my lashes but I could still see the difference it made to my eyes.


Next is on to my cheeks. I asked Aimee if they contour and she told me that they don't because Majolica Majorca is all about looking natural and youthful.

 Cheek Customize (P495)
PK333
RD3255

Aimee used two cheek customize blushes for my face. The pink she says would look beautiful on my skin and she added a little bit of the golden red tone to warm the blush color.


Of course to finish the look, Aimee applied Rouge Magix Gloss in OR317 (P495) on my lips. It reminds me of MAC Lipglass because of the consistency.

 Loving the packaging!!!

So here's a rundown of the products used on my makeover:

 Lash Expander Plus | Skin Lingerie | Skin Remaker Pore Cover OC20

 Majolook Trick On BR751 | Illuminator BR355 | Perfect Automatic Liner in Black

 Cheek Customize PK333 / RD3255 | Brow Customize Set in BR660 | Cream Liner in Black |Rouge Magix OR317

I want to thank the beautiful ladies from Majolica Majorca for my makeover:

 Marife of SM Cubao branch

Aimee, Chief Makeup Artist of Majolica Majorca

So now here's my photo after the makeover!


No concealing done. That's how good the coverage of the foundation is.

My makeup actually lasted the entire day! :) I'll post a separate entry and show you photos after more than 8 hours! So amazing!!! I can't wait to go shopping soon!
Hey everyone! It’s a “working Tuesday” for me today and thankfully, I was able to upload another video. I have quite a handful of videos that I haven’t editted and uploaded yet, and I actually have tons of blog entries to do too! Sometimes it’s just quite hard to find time to sit in front of the computer. I’m usually mobile. If you follow my entries, you’d see that I also use my Galaxy Tab to post blog entries sometimes.  ðŸ™‚
Anyways, here’s a look that I did for my youtube channel. I’ll post about it tomorrow. For now, I wanted to focus on how I apply my false eyelashes. I know that it’s quite difficult and quite tricky to apply and it actually takes a lot of practice to perfect it. I honestly practice a lot of times because I like to be able to put on my false eyelashes easily and fast.
I decided to make a separate entry about it because I would usually skip or do this really fast in my makeup tutorials to save time. I also remember my mom asking me to teach her how to put on false eyelashes. I even gave her a pair of falsies and lash adhesive so she can practice. So at least she can just watch this video (and so can you) to learn how to do it. 🙂 
Things you need:
1. False Eyelashes – I used falsies that I bought from Say Artillero
2. Lash Adhesive– I used Cinema Secret Spirit Gum
3. Tweezers
4. Mascara– I used Maybelline Long Extreme Stiletto Mascara
Steps:
1. Curl your real lashes and apply a single coat of mascara.
2. Cut and shape the false eyelashes to fit your eyes. Cut the outer part of the falsies.
3. Play with the lashes a little and make it more flexible and this makes the lash band more curved and will fit your eyes better. 
4. Apply lash adhesive and I would suggest applying extra on the inner and outer part because these tend to fall off easily. Wait for it to be tacky before applying the lashes.
5. Start on the center. Use tweezers or your fingers and press the lashes as close as possible to the lash line.
6. Adjust the lashes using tweezers or your fingers.
7. Bind the falsies to your real lashes by applying mascara.

Again it’s not very easy but once you see how beautiful your eye makeup turns out, it’s worth all the practice and effort. 🙂 I hope this short tutorial helps!
Hey everyone! It's a "working Tuesday" for me today and thankfully, I was able to upload another video. I have quite a handful of videos that I haven't editted and uploaded yet, and I actually have tons of blog entries to do too! Sometimes it's just quite hard to find time to sit in front of the computer. I'm usually mobile. If you follow my entries, you'd see that I also use my Galaxy Tab to post blog entries sometimes.  :)

Anyways, here's a look that I did for my youtube channel. I'll post about it tomorrow. For now, I wanted to focus on how I apply my false eyelashes. I know that it's quite difficult and quite tricky to apply and it actually takes a lot of practice to perfect it. I honestly practice a lot of times because I like to be able to put on my false eyelashes easily and fast.


I decided to make a separate entry about it because I would usually skip or do this really fast in my makeup tutorials to save time. I also remember my mom asking me to teach her how to put on false eyelashes. I even gave her a pair of falsies and lash adhesive so she can practice. So at least she can just watch this video (and so can you) to learn how to do it. :) 


Things you need:
1. False Eyelashes - I used falsies that I bought from Say Artillero
2. Lash Adhesive- I used Cinema Secret Spirit Gum
3. Tweezers
4. Mascara- I used Maybelline Long Extreme Stiletto Mascara

Steps:
1. Curl your real lashes and apply a single coat of mascara.
2. Cut and shape the false eyelashes to fit your eyes. Cut the outer part of the falsies.
3. Play with the lashes a little and make it more flexible and this makes the lash band more curved and will fit your eyes better. 
4. Apply lash adhesive and I would suggest applying extra on the inner and outer part because these tend to fall off easily. Wait for it to be tacky before applying the lashes.
5. Start on the center. Use tweezers or your fingers and press the lashes as close as possible to the lash line.
6. Adjust the lashes using tweezers or your fingers.
7. Bind the falsies to your real lashes by applying mascara.


Again it's not very easy but once you see how beautiful your eye makeup turns out, it's worth all the practice and effort. :) I hope this short tutorial helps!
So I have been contemplating if I should go ahead and post my Crest experience. I decided to go ahead and do so because I figured, I actually learned about Crest White Strips and decided to purchase because of so many reviews I read in different blogs. So here is my story.
I have always wanted to buy Crest White Strips because there were so many good reviews and knowing that I do not have the perfect set of teeth, whitening it sounds good to me. I never really got to buy them because 1. They weren’t cheap at all! 2. It’s not readily available in the department store or grocery, even in personal care stores. 3. I always ended up thinking I didn’t really need one. So my quest for a whiter teeth stopped for a long time.
Until I went to the dentist and updated my whole teeth/dental hygiene. There were so many improvements and updates that I did which included regularly using mouthwash. (I only use mouthwash when I feel like it. But take note that I always brush and floss.) I decided since I was already trying to make my teeth better, why not give Crest a try? And so I went to the internet and googled my way to buying a 14 day program/set.
Crest White Strips Supreme
P1,100 for 14 days
I got the Supreme one which is stronger than the classic strips. I thought maybe it would work faster and I’d see the results earlier than usual.
It’s quite easy to use actually. But before trying it out, of course I read lots of tips and advices on how to use it. Basically one pouch has 2 strips. One for the upper teeth and one for the lower teeth. The strips has a net texture. And it’s quite sticky.
At first, I had a hard time placing the strips perfectly on my teeth. Working fast is really important as it slides off really easily and it becomes tacky fast too.
Here’s a photo of my teeth before using Crest White Strips.
DAY 1
It’s kinda yellowish.
I tried to take photos of my progress to see if it does make a difference. They say that you can choose to use it everyday or every other day depending on your teeth sensitivity. I have sensitive teeth, sensitive enough that I have a hard time drinking iced drinks without a straw, or even just cold drinks. I used to use Sensodine as well because it really did help my teeth sensitivity.
DAY 2
Looks a little lighter.
I didn’t feel any sensitivity at this point so I decided to use it everyday. I also leave the strips on for 30 minutes to an hour and I try not to talk too much. Oh by the way, I brush my teeth after using the strips.
DAY 3
Same as Day 2.
I read somewhere that you can actually see a difference after three days. Well based on the photos above, Day 2 and Day 3’s the same. But my teeth did improve compared to Day 1. Also, you can see a little bleaching on my gums. I read that there’s nothing to worry about as it will return to its natural color. 😉
DAY 5
Any change?
Day 5 and 6 I started feeling the sting. While the strips were on my teeth, I felt a little sting a few times. I thought that maybe it was the teeth sensitivity. So I  decided to skip a day because I cannot risk having sensitive teeth.
DAY 7
Brighter teeth!
I was so excited to complete the 7 day program because you can actually buy Crest White Strips that’s just for 7 days. My family actually noticed and told me that my teeth got whiter. Of course it was what I was hoping for and I was just so happy and couldn’t wait to see the final results!
DAY 14
Last Day – Noticeably whiter! 😀
Alas the day has come! I was ecstatic to finish the program. And honestly, I actually don’t see a difference when I look in the mirror, maybe because it’s really a gradual change. So seeing the results in pictures just reassures me of what I have been hoping and praying for!
See the difference for yourself:
YEEEEEYYY! 🙂
So do I recommend Crest White Strips? Yes I do. I actually would recommend you to try the 14 day program especially if you have the extra money to shell out. 🙂 I haven’t tried the  other variants yet so I can’t compare them and say that Supreme is the best. But again, the seller told me that this is the strongest Crest White Strip variant. 🙂
So since then, I have just been more confident. And I actually started loving red lipsticks again. I mentioned this in my other blog post, I used to not wear red lipstick because I felt that it shows my yellowish teeth. So now, I feel like I can wear anything and pull it off! 🙂 Yey for a brighter smile!!! 🙂
Newer Posts Older Posts Home

ABOUT ME

I’m Char, your hyphenated woman. I’m an entrepreneur, a wife, mom of three (girl and boy/girl twins), professional makeup artist, a beauty and lifestyle blogger and a Youtuber.

My blog is a peek at a modern woman’s life. I babble about beauty, motherhood, food, travel and a whole lot more.

Yellow Yum is created to document my interests and it’s also created for the purpose of inspiring and helping other people to enjoy life and everything that it’s got to offer!

SUBSCRIBE & FOLLOW

DISCLAIMER

Some posts have missing photos due to blog migration.

Nia's Hearing & Speech Journey

Nia's Hearing & Speech Journey
Read about Nia's Hearing Journey

Search This Blog

Advertisement

For advertising concerns, please email yellowyum@gmail.com

POOCH PARK DOGGIE DAY CARE
Pet Grooming, Daycare & Boarding, Pet Food & Supplies, Pet Cremation
www.facebook.com/PoochPark

LITTLE YUM CHA
Premium Frozen Dim Sum
www.facebook.com/littleyumcha
www.instagram.com/littleyumcha

UNIOIL MARCOS HIGHWAY
www.facebook.com/unioilmarcoshighwayph

FOLLOW ME ON INSTAGRAM: @YELLOWYUM

More about the writer

More about the writer

Work WIth Me

Work WIth Me

Youtube Channel

Youtube Channel

Designed by OddThemes | Distributed by Gooyaabi Templates