Yellow Yum
  • Main
  • >
  • Beauty
    • Makeup
      • Face
      • Eyes
      • Eyebrows
      • Lips
    • Looks
    • Skin Care
    • Hair
    • Nails
    • Tools
    • Fashion
  • Motherhood
    • Pregnancy
    • Baby
    • Toddler
    • Kid
  • Food
  • Home
    • Family
    • Wedding
    • Home Management
  • Adventures
    • Travel
    • Hotels
    • Spa/Massages
    • Random Ramblings
  • #CalEars
  • Giveaways
  • Youtube
  • Contact Me
I'm a sucker for flowers. I guess that makes me a girly girl. I love receiving flowers any day. It screams romance and love. I've received flowers from my husband back when we were still dating, but now that we're married, he has yet to give me a bouquet. Hmmm... I wonder if he's reading my blog?! ;) *evil laugh*

So choosing my bridal bouquet was a breeze! I already knew what I wanted, how I wanted it to look like. I definitely wanted red red roses with some crystal embellishments. I wanted it hand tied with a ribbon and just a few pieces of leaves.

My bridal bouquet

So as we searched for a supplier, I knew that it was very critical to explain what I wanted. Afteralll, I will only have one bridal bouquet ever. So I researched different suppliers, I didn't want to spend too much on the flowers since I know it's just flowers and they'll die a day after. So my husband and I went to Dangwa, a place where you can find very cheap flowers. And we met with Mang Boy Mahusay, whom I researched about. I read so many wonderful reviews and just one or two negative comments. When we were talking, he seemed really nice so we entrusted him with the flowers including my bouquet.

Come my wedding day, October 18, the flowers were delivered to my husband's room and when it was turned over to my suite, to my horror, I saw a fake flower. When I observed it, I realized it was a real rose but was actually white, so Mang Boy spray-painted it with color red. I was so furious. I was so mad. I told my dad about it and my husband. My dad told me to call the supplier and demand an explanation and for them to change my bouquet. The bouquet was nothing like what I envisioned it. Yes, there was crystal embellishments, since I bought those and delivered it to Mang Boy myself and explained to him that I wanted those in my bouquet. But the flowers weren't that plenty. 15 pieces. I am a tall woman, so a 15 pc bouquet doesn't look proportionate on me, especially how they tied the roses together. 

Eventually, my husband called the supplier and scared them off, I guess. My husband and dad took care of the situation since they didn't want me to stress over it anymore. Luckily, we were staying at Crowne Plaza Hotel which was beside Robinsons Galleria. They went to Holland Tulips and asked the lady to fix the bouquet. She added a dozen more red roses and put some Angel's Breath and of course, removed the painted rose.

My dad delivered the bouquet to me. When I got it, I squealed and thanked him for saving my bouquet. My bridal bouquet was perfect. Just like how I envisioned it. Thanks to the hard work of my husband and dad. According to my husband, he was willing to shell out even a thousand bucks (I think that's how much the roses were from Holland Tulips or more), just as long as my bouquet turns out perfect.


I guess the moral lesson is to stick to your vision. I actually had a sample photo of what I wanted and gave it to the supplier, just to make sure they know what to do. Also, choose a supplier you can trust. I know, we wouldn't really know. But maybe just have a back up. A just-in-case scenario, just like mine. Remember, it's a once in a lifetime experience and the bridal bouquet is a crucial part of the wedding. It's in most of my photos. And when I look at our photos, I'm just so glad that the issue was resolved and I got my dream bridal bouquet.
I received Clinique Youth Surge Night from the Clinique event I attended last month. I’ve been using it during night time and also tried using it even in day time as a substitute for Moisture Surge.
After trying this product for three weeks, I noticed that my face  is softer. I don’t have wrinkles and fine lines yet, so I can’t say anything about that. But I noticed that it’s more supple and hydrated. Obviously this should be the effect of moisturizers. 
Clinique’s Youth Surge Night is actually pretty heavy so it gives intense moisturizing. I like it! 🙂 I only use a small amount of product. During day time, I make sure that it doesn’t feel too much. Though I’ve tried this, I made a mistake and lathered way too much product, it didn’t make my makeup cake. Fortunately!
What I don’t I like about this product though is the smell. It has a faint sour smell. Even my All About Eyes Rich has this smell, but is a bit milder. I guess that’s really their smell, but I, personally don’t like it. And it bothers me a little when I put the product on my whole face.

How do I use this during day time? I use it just like Moisture Surge. I put a small amount on my hands, rub them together and just pat it on the face after my makeup application. It hydrates and gives moisture to the whole face. When I use this, I don’t spritz Skin Hour’s Firming & Clarifying Toner anymore, because it does the same thing.

I love how softer my face is. I’m blessed with soft skin, but with the Youth Surge, my face is now baby soft. Really! :p

I received Clinique Youth Surge Night from the Clinique event I attended last month. I've been using it during night time and also tried using it even in day time as a substitute for Moisture Surge.


After trying this product for three weeks, I noticed that my face  is softer. I don't have wrinkles and fine lines yet, so I can't say anything about that. But I noticed that it's more supple and hydrated. Obviously this should be the effect of moisturizers. 


Clinique's Youth Surge Night is actually pretty heavy so it gives intense moisturizing. I like it! :) I only use a small amount of product. During day time, I make sure that it doesn't feel too much. Though I've tried this, I made a mistake and lathered way too much product, it didn't make my makeup cake. Fortunately!


What I don't I like about this product though is the smell. It has a faint sour smell. Even my All About Eyes Rich has this smell, but is a bit milder. I guess that's really their smell, but I, personally don't like it. And it bothers me a little when I put the product on my whole face.

How do I use this during day time? I use it just like Moisture Surge. I put a small amount on my hands, rub them together and just pat it on the face after my makeup application. It hydrates and gives moisture to the whole face. When I use this, I don't spritz Skin Hour's Firming & Clarifying Toner anymore, because it does the same thing.

I love how softer my face is. I'm blessed with soft skin, but with the Youth Surge, my face is now baby soft. Really! :p
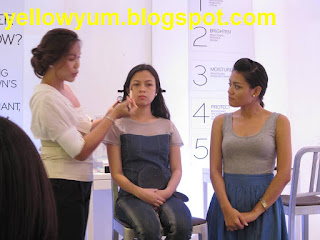
On to an event I attended last May 15, Saturday. The Bobbi Brown Workshop courtesy of Suesh Cosmetic Brushes. I was excited about the workshop because Bobbi Brown is one of the brands that I've always heard about that stays true to fresh looking skin.


I was a bit late to the event but I only missed the introduction part. Whew! Ina, the brand coordinator of Bobbi Brown was gracious to conduct the workshop together with Bea, Bobbi Brown makeup artist. They were a great tandem! 

Anyway, For Bobbi always start with a well moisturized and primed face.  Moisturizer is the key to a fresher looking skin. 

Pre-Makeup

Step 1: Concealer

First is to use a corrector to lighten the area. The correctors are usually pinkish/peachy shade. This helps lighten the dark circles/eyebags. Correct the undereye area first and then apply concealer. Use a concealer brush for controlled application and with warmed fingers, dab it to blend to the skin. The concealer will lift the area making the undereye look fresher and cleaner. After this, it's important to set again with powder. A pale yellow tone of powder is best. Try Bobbi Brown Creamy Concealer Kit. This kit includes Creamy Concealer on top & Sheer Finish Loose Powder on bottom to set concealer for long-lasting wear.

Step 2: Foundation

After finding the perfect foundation shade by swatching 3 shades to the skin and finding the one that disappears into the skin, apply foundation where you need it. Foundation helps brighten, reduce discoloration and minimize appearance of pores. Focus on the center of the face and blend it out with a foundation brush. For a natural finish, liquid foundation is advised since it is buildable and sheer. Semi-matte ones for oily skin. And for dry skin, a tinted moisturizer or water based liquid foundation is recommended.

Step 3: Powder

After applying foundation, set again with a loose powder. If the skin feels dry, dust powder only around the nose and forehead since these are the areas which usually get oily first.


Step 4: Blush

Sometimes after applying powder, the skin becomes pale and flat, so dust a bit of  bronzer on the forehead, cheeks, nose and chin. Dust it outward. For a soft matte look. use Bobbi Brown Bronzing Powder. This will warm the skin and give it a natural flush to the skin. 


Use 2 shades of blush. 1 a more natural warmer shade and one will be the pop of color. (This was the first time I heard about "pop pf color.") The warmer shade should be applied from the apples to the hairline, and blend a little bit downwards. The pop of color will be applied on the apples, on top of the warm blush shade.
For dry skin, pot rouge is recommended for its creamy texture.

Step 5: Lipstick/gloss

 Step 6: Lip Liner

For a natural look, find a shade that evens out and is closest to your lip color. This will give a very natural kissable lips. Apply lip liner on top of the lipstick. (This is again, my first time to hear this step. We usually do it the other way around. Lip liner first, then lipstick.) If you put lip liner on top, it will define and make lipstick stay longer. Good tip! :)


 Step 7: Brows

Fill in the gaps by using eye shadow that matches your hair color. Apply it with an eyebrow brush. Use a spoolie to blend the eyeshadow evenly. Start at the highest point or the arch of the eyebrow and fill in. Apparently, brown eyeshadows are used. To set unruly brows, use Natural Brow Shaper.


Step 8: Eye Shadow

Use 3 colors of eyeshadow for a natural look. Light shade for the base, medium and dark. Deposit the eyeshadow first and then blend. Use the medium shade all over the eyelid, the light shade as highlight and the dark for eyeliner.

Bobbi Brown does not contour, she believes in "blended eyes."


Step 9: Eyeliner

Use a dark colored eyeshadow for lining the eyes or use Long Wear Gel Eyeliner with an ultra fine eyeliner brush. It's best to just build the eyeliner, start with a small amount first. For chinitas, to make the the eyes look bigger, apply liner and make them thicker on the outer side.

Step 10: Mascara

Hold the mascara wand parallel to the floor and brush from base to tips. Wiggle the mascara wand to deposit more product.


For self application, when applying mascara, look at the opposite direction. See photos above. This makes application easier. Try Extreme Party Mascara. It's volumizing and makes you the center of attention! :p


Ina and Bea decided to give Mabel a little more color, so Bea applied a sparkly eyeshadow onto the center of her eyes.

Finished look


Mabel, the pretty model that day.
She looks like Aubrey Miles, doesn't she?

Bobbi Brown sells customizable palettes. So we can choose which shades we like to go on the palette. They also have colored strips for sale. Pretty pretty pretty! :)

"Looking your best is simple and achievable- all it takes is knowledge, a few easy steps, and the right products." - Bobbi Brown

 I learned so much and I loved how simple the steps are. After the event, I actually tried some new things I learned such as applying lipliner after the lipstick application. Pretty smart, and really helpful.
We went to Singapore for the first leg of our honeymoon (Oh yes, I still haven't blogged about hmn yet. Must do that soon.) and I fell in love with the country completely. Their food were of course expensive, since it was P33.00=1.00 SGD. Luckily I have friends who live there (saying hi to Kaths and Mari!) who were kind enough to tour us to really yummy and more affordable restaurants. So because of those trips, I learned to love their food too.

I was surprised when I saw an Orchard Road sign in SM Megamall and wondered what it was. Eventually I found out that it was a restaurant serving authentic Singaporean food. Ooh!!! Must try!


First thing to do is to answer this form and present it to the cashier upon ordering.


When I saw the menu, it took me back to our HMN. I felt really excited. :) Plus I knew how yummy Singaporean food is.


Wait for the food to be served.

Here are some photos of their interiors.


This is their open kitchen.


And here are our orders:

Hainanese Chicken Rice P155.00

What can I say???? It was one of our favorite "must eats" when we went to Sinagpore. I personally liked the sauce that Orchard Road paired it with. The rice was Hainanese rice too. Really good. For me, it wasn't just your typical white chicken.

Bak Kut Teh P150.00

This is my favorite from all our orders. I loved the flavor of the soup (it was actually better than the one we ate in SG), the tenderness of the meat. The only thing they can improve on is to put more meat. But other than that, it was wonderful!

Satay Chicken (4 sticks) P110.00

This was okay. I liked the sauce, it kinda had an Indian flavor to it. Nothing too special about this compared to the others we ordered.

Plain Rice P25.00

Teh Tarik P50.00

This was their version of milk tea. But for me it wasn't good. I think because I'm used to Thai Tea (which I love btw.), Teh Tarik isn't sweet and it tastes like real tea. Actually Orchard Road's version is the same as the one sold in SG and even in Malaysia. It's the same formula I think. Because if I remember correctly, I didn't like their Teh Tarik in Malaysia either. Just my personal preference. Others might like it, like my sister. She likes Nai Cha so she likes Teh Tarik too.

Kopi Tarik P55.00

This was my drink and I liked it. It was sweet, but not too sweet to overpower the drink. Still had a coffee kick to it. I remember my husband ordering this while we were in MY and I ordered Teh Tarik and I ended up drinking this instead since I liked the taste of Kopi Tarik better. Hehe!

It was a very filling lunch and it was so nice to reminisce. :) We swore to go back. We'd probably bring my MIL sometime soon. Must eat must eat! I wonder if the owner/s of Orchard Road is/are the same as the owner/s of Makansutra in Manila Ocean Park?

I have super super oily lids. I can't stand it! If I don't put on primer, my eyelids get oily after 2 hours. My skin is combination so I usually get oily just in the tzone area, but my eyelids are a whole different story.

After several research and canvassing, I decided to take some action and get a really good primer.

Urban Decay Primer Potion
UDPP
Original Formula
This miracle eyeshadow primer is unmatched by any other in the beauty industry! The genie in this bottle fulfills three wishes: eyeshadow that lasts, more vibrant and lasting color, and absolutely NO creasing. Apply Primer Potion to lids before shadow application. It dries down almost instantly (and invisibly), creating smooth lids that are super powered eyeshadow magnets.

The formula is full of silicone, which you beauty mavens know makes for a smooth and silky application. Packaged in a pretty genie bottle, our Potion applies with a magic wand and flocked applicator.

Tips: A little goes a long way! Apply a thin coat and let dry, then apply Eyeshadow as you normally would. Then DARE it to crease. (Double-dog dare it, even!)
I've been reading and hearing about UDPP for so long, but just didn't think I'd need it (Even though I know how yucky oily my eyelids are.) But since I'm back into the zone of makeup shopping, I figured it's time to invest in one good eyeshadow primer.

The only thing I don't like about it is the packaging. :/ Product oozes out once used and it's really sayang. I only need a small amount of product, but since it oozes out, the extra product goes to waste. :( Will research how to prevent the oozing part. According to my husband, when I've finished 1/4 or 1/3 of the product, the oozing should stop.

Orginal formula

Blends and become invisible.
It doesn't alter the color of the eye makeup.

So I took it to the test. I used the free brown eyeshadow given by Dollface Cosmetics and after 7 hours, here it is...

still fine!
No creasing whatsoever!

no flash

I actually checked it when I got home which was about 10 hours after I applied my makeup and it's still fine! Woohoo! Happy happy! :) I'll update you guys again if I see any other improvements (how can it still improve if it's already perfect, right???) or disappointments. But for now, I'm happy with the results!
Newer Posts Older Posts Home

ABOUT ME

I’m Char, your hyphenated woman. I’m an entrepreneur, a wife, mom of three (girl and boy/girl twins), professional makeup artist, a beauty and lifestyle blogger and a Youtuber.

My blog is a peek at a modern woman’s life. I babble about beauty, motherhood, food, travel and a whole lot more.

Yellow Yum is created to document my interests and it’s also created for the purpose of inspiring and helping other people to enjoy life and everything that it’s got to offer!

SUBSCRIBE & FOLLOW

DISCLAIMER

Some posts have missing photos due to blog migration.

Nia's Hearing & Speech Journey

Nia's Hearing & Speech Journey
Read about Nia's Hearing Journey

Search This Blog

Advertisement

For advertising concerns, please email yellowyum@gmail.com

POOCH PARK DOGGIE DAY CARE
Pet Grooming, Daycare & Boarding, Pet Food & Supplies, Pet Cremation
www.facebook.com/PoochPark

LITTLE YUM CHA
Premium Frozen Dim Sum
www.facebook.com/littleyumcha
www.instagram.com/littleyumcha

UNIOIL MARCOS HIGHWAY
www.facebook.com/unioilmarcoshighwayph

FOLLOW ME ON INSTAGRAM: @YELLOWYUM

More about the writer

More about the writer

Work WIth Me

Work WIth Me

Youtube Channel

Youtube Channel

Designed by OddThemes | Distributed by Gooyaabi Templates